

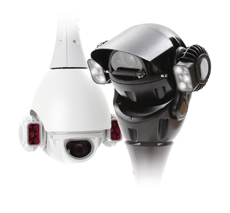
 The X series Redvision RVX40-IRWL-W PTZ is a fully functional colour/mono analogue PTZ dome camera with a 40x optical zoom. X series cameras are available with a number of options for zoom, mountings and lighting. The unit evaluated was supplied for upright mounting with a sun visor, wiper and dual light illumination (IR and white).
X series cameras are normally supplied as a dome camera but removal of the top cover allows them to be inverted for mounting in the upright position for use a ball type PTZ. The camera is powered from a 24VDC PSU supplied separately. Both camera and PSU carry an IP67 environmental rating.
Connection between PSU and camera is via a composite cable available in standard lengths of 4m and 10m depending on the mounting option chosen (customised lengths available to order). These cables are supplied pre-terminated with a plug at one end for direct connection to the camera.
Redvision manufactures a range of brackets and accessories in black or light grey finish, to suit all mounting options.
The evaluation unit was supplied pre-configured for upright mounting with a pedestal bracket. Assembly of the camera head onto the bracket is quick and simple. The mounting is accessed via removal of the cover plate (two allen screws) to reveal a slotted mounting plate. Having unscrewed the lock nut fully, the camera head is simply slid onto the mounting plate (in the correct orientation) and the lock nut hand tightened. The process is so easy it’s disconcerting but in actual fact, the camera locks into place to produce a very strong rigid assembly. Cable entry to the camera is either via the opening in the base of the bracket or the side entry gland.
As supplied the mounting arms for the camera ball itself are in the upright position. These may be canted forward allowing the camera to look directly downwards by removing the mounting arm trims, loosening the allen screws (one turn), rocking the ball forward and retightening. Spare self-adhesive trims are provided with the unit. Note that the relevant camera orientation needs to be selected within the camera set-up menu to ensure correct operation.
Connection of the camera to the PSU is straight-forward and clearly detailed on the accompanying installation instructions. Our evaluation unit was a basic power supply but variants are available with wired and wireless alarm inputs/outputs.
Protocol, baud rate, real time clock and camera address are selected via dip switches from the back of the camera ball after removing a large weather sealed screw cap. Several telemetry protocols are provided onboard including BBV (422 and coax), Pelco (D and P), Bosch (Forward Vision), Dennard and Vista. During testing we used both the BBV coax and Pelco D.
Read the full product review in the October edition of PSI magazine.