

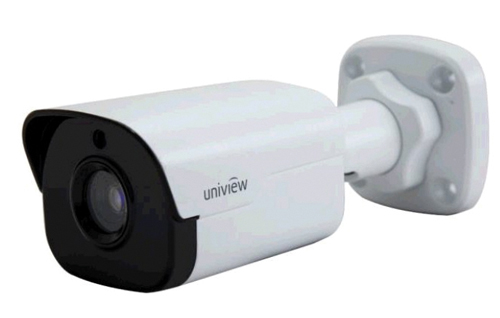
 The IPC2124SR3 is a small metal-cased 4 MP IP bullet style camera with integrated universal joint mounting bracket. The quick guide provided and the installation manual (available online) are well laid out and in reasonably good English.
Operation
At power up there are two red LEDs that illuminate for a few seconds beneath the lens. DHCP is set by default so if on an existing network the camera will be allocated a suitable free address. The Quick guide advises you to use EZStation software to view and change the camera’s configuration which was downloaded. This includes EZManager software that connects to the camera and allows configuration changes to be made using the same menu structure as the browser connection but with good speed of operation. This allowed configuration changes to be made but some options needed to be re-selected before they would show correctly on screen.
Configuration Options
The main menu options from the browser or EZManager are as follows;
- Common – camera and firmware details plus basic video parameters
- Network – TCP/IP and port settings
- Video – Stream settings for the main, sub and third streams
- Image – wide range of image controls such as brightness, contrast, noise reduction etc.
- Events – Motion detection and tamper alarm settings
- System – Security settings along with time & date and maintenance features
Some unconventional terminology was encountered such as a default processing mode of “Fluent prior”, changing this to “Ultra low delay” and changing the transmission mode from TCP to UDP improved the image latency, but only to around 2 seconds. The D1 Sub stream was checked and found to have a very good latency figure of around 200ms including the browser display so it was not clear if the main stream delay was created by the camera’s processes or by the software decoding for the display.
When entering the set-up modes for image attributes such as OSD and privacy zones, the display occasionally presented a frozen scene image to work on. A live view otherwise appeared and this improved the set-up experience.
Up to eight on-screen text display lines are available with the first two allocated by default to Time and Camera number however all can be changed and positioned to any part of the screen by setting x and y coordinates. These are both in the range of 0 to 99 with 0, 0 being the top left corner of the screen.
Up to four privacy masks can be set. These first appear as a small box in the top left hand side of the image window and either of the four corners can be used to re-size the rectangle. You can drag any mask to re-position it by dragging any side of its box. Masks appear on screen as a solid black box.
Configuration of the Day / Night and illumination modes was straightforward but there appeared to be no way to prevent the two red LEDs illuminating when in low light mode but this may be seen as a useful deterrent if covert night-time operation is not required.
The camera supports scene motion detection through up to two rectangles that can be sized and positioned on the screen to suit the application; Sensitivity, Object size and History can be separately set for each of the two zones.
Read the full review in the February 2016 edition of PSI magazine