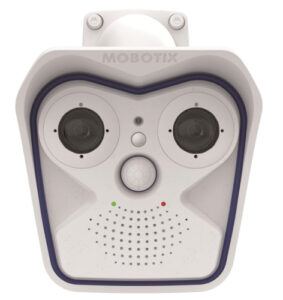
 Recognisable by its non-conventional form, this version of the Mobotix M16 is supplied with individual colour and monochrome modules mounted side by side. This removes the need for a mechanical infrared cut filter. The use of purely electronic light control means that there are no moving parts within the camera which would be expected to extend its operational life. The system allows for a wide range of camera modules (sensors) to be fitted including very wide-angle fisheye variants and thermal modules or to be supplied without so that camera modules can be fitted to suit the installation. An LPF (Long Pass Filter) variant is also available for number plate capture.
The modules in this version were both based on 1/1.8” 6MP (3072 x 2048) CMOS sensors. In addition to video motion detection, the unit includes a shock detector and PIR sensor.Ingress protection is to IP66 and impact protection to IK07. A microphone and loudspeaker are built into the camera. Power is PoE at 7.5W.
Getting started
DHCP is enabled by default so accessing the camera is relatively straightforward on an enabled network. Alternatively, either a static IP address is given in the manual or MxManagementCenter software will discover all of their devices beyond the local subnet, but both of these must be downloaded from the Mobotix website.
At first browser login connection you are presented with a request to change the factory password. Here a warning is given that if the administrator password is lost the camera will have to be sent back to Mobotix for a factory reset.
Once the browser accesses the camera an image is immediately available using a JavaScript view but this did have apparent “ringing” on high definition edges. An MxPEG ActiveX component is available to download from the camera and once this is applied the image is clear and can be scaled to suit the browser display area.
Menu options
The browser display window has a series of menu options arranged down the left-hand side of the pane and additional Toolbar Icons and drop-down menu items along the top. Above the menu column there are icons for Live, Play and Multiview to switch camera viewing mode and then above the image pane there are three “Quick Controls” in the form of drop-down selection boxes for Frame Rate, Function selection and Commands. Additional Icons are provided for locking the electronic Pan/Zoom feature, Setting High Quality, enabling Audio and saving a JPG snapshot of the current scene.
The menu column starts with:
Admin Menu – this accesses System Information, Security, Hardware configuration, Page admin, Network setup, MxMessage system, Storage, Logos & Image profiles, Transfer profiles, Audio & VoIP telephony, Camera admin, Configuration, System updates and General Tasks.
Setup Menu – General image and exposure settings including text display and virtual PTZ, plus Event control options for arming, actions and recording.
Beneath the two main menu buttons are a series of “Soft Buttons” that are pre-configured for functions such as Arm & Record, Audio On, MxPEG On & Off. Further down are buttons for Allocating a User command plus buttons to blink the front LEDs and Play a stored sound; these would be useful for camera identification on larger installation commissioning tests.
The final default Soft Buttons are allocated to Event playing and listing then virtual zoom features.
The drop-down Quick Controls access features including; Camera Selection, Display Modes, VPTZ & views, Recording, Image Quality & Exposure, Focussing Aid, Audio Sensitivity & Volume level, Browser codec type and Manage Settings to Store, Load & Restore all settings.
Network settings are comprehensive for the experienced installer with various test facilities provided. Custom Signals can be used to activate functionality based on Image input, Time schedules or from an allocated Master camera.
Read the full review in the November 2018 edition of PSI magazine


